The Terminal and Project Organization
The Terminal#
Switching to a plain text workflow requires that you adjust the way you interact with your computer. Rather than pointing and clicking and navigating through different windows we will be using what is a primitive technology in computing: the Terminal. It was once the case that all interactions with a computer were done with nothing more than a keyboard, not even a mouse. Of course computing has come a long way and most of your interactions with your computer take place with a mouse, touch pad or touch screen and it can be intimidating to approach the terminal, but it is really quite easy to use and helps for you to learn where things are actually located on your computer. This latter feature helps you to better understand the file structure that you are going to be leveraging to both organize your project and typeset documents. Here I will provide a quick tutorial on how to use the Terminal and some of the most basic and essential commands.
The Terminal in macOs
NOTE: Windows and macOs use different kinds of terminals, and even in macOs there are slightly different versions of the same terminal. This means that you will have to learn commands for your operating system. Also, they are called slightly different things. On Windows it is called “Command Prompt” and there is a specific program called PowerShell. Don’t use PowerShell, use Command Prompt, sometimes referred to as CMD which can be found in the “Accessories” part of the Start Menu. On macOs you will find the terminal under “Other” in your Launchpad. Here is a table with commands across operating systems:
| Windows CMD | Task | macOs Terminal |
|---|---|---|
dir |
List files and folders | ls |
cd |
Full path of current folder/directory | pwd |
cd <path to directory> |
Change folder/directory | cd <path to directory> |
cd .. |
One directory up in directory tree | cd .. |
mkdir newFolder |
Create new directory in current directory | mkdir myFolder |
rmdir myFolder |
Remove a directory* | rmdir myFolder |
ren oldFolderName newFolderName |
Rename a directory | mv oldFolderName newFolderName |
robocopy myFolder <path to destination directory> |
Copy a directory | cp -r myFolder <path to destination directory> |
move myFolder <path to destination directory> |
Move a directory | mv myFolder <path to destination directory> |
ren oldFileName newFileName |
Rename a file | mv oldFileName newFileName |
copy myFile <path to destination directory> |
Copy a file | cp myFile <path to destination directory> |
move myFile <path to destination directory> |
Move a file | mv myFile <path to destination directory> |
cls |
Clear the terminal screen | clear |
A Short Tutorial#
First some vernacular for you to be familiar with: when working in the terminal you will be dealing with Files and Directories. A directory is what is otherwise called a “folder”, a container for files. A file is the basic unit for holding data in your computer. A file is the thing that you typically open with your cursor (like a text file, Word document or an image file) by double clicking on it. We will be dealing with programs on the terminal but not in the way you have done before. We will get there eventually, but just remember files go in directories and directories can themselves have sub-directories with files in them. This is the hierarchical folder structure that is typical of computing systems.
With the terminal open go ahead and type in ls and hit Enter. In macOs you should see something like this print out:
(base) MacBook-Pro:~ timothyelder$ ls
Applications
Desktop
Documents
Downloads
Library
Movies
Music
Pictures
Public
The ls command in macOs lists the contents of the current directory you are in. To determine which directory you are in type in pwd and hit Enter.
(base) MacBook-Pro:~ timothyelder$ pwd
/Users/timothyelder
pwd stands for “present working directory” and prints out the path to the directory you are in. The “working directory” just means whatever directory your terminal is open in. On macOs, whenever you open a terminal it automatically opens in what is known as your “Home” directory which has the files that appear on your Desktop, in your Documents directory and other directories associated with Videos, Music, etc. etc.. A path is the generic way of referring to the address of a directory or file on your computer. Let’s start to navigate your computer and manipulate directories and files from the terminal.
The way to navigate to another directory from your working directory is to use the cd (or the “change directory”) command and specify which other directory you want to change to. Let’s change to the Documents directory by typing in cd /Users/timothyelder/Documents. This is the path for me, as my user name on my machine is “timothyelder”, so you’ll have to use your username or whatever is in the path when you use the pwd command. After using the cd command to get to the Documents directory let’s create a sub-directory there to store the files related to the Working Group. To do this you will use the mkdir or make directory command. Type mkdir plaintext into the terminal and hit Enter. Check to see that the new directory has been made by typing in ls again and see that the directory has been made.
Now, when using the cd command (or any other command that takes in a path as an argument) you can use either absolute or relative paths to specify where you want to go or what file/directory you are specifying. An absolute path uses the full amount of information to describe the address of he file or directory you are referring to, such as /Users/timothyelder/Documents/plaintext. That is the absolute path of the plaintext directory. Using the absolute path makes everything explicit, but takes up a lot of time when you have to type it in over and over again into the terminal. To save yourself time you can use a relative path which is relative to wherever your terminal is open on your computer. For instance, if you did the last set of instructions correctly, you created a directory called plaintext in the Documents directory and we noted the absolute path above. The plaintext directory is immediately accessible to the Documents directory because the former is a sub-directory of the latter, so simply typing in cd plaintext will move your terminal into the plaintext directory.
So go ahead and cd into that new directory and type ls again. As you’ll see, nothing is printed out from the list command because it is a brand new directory with no files or subdirectories. Next thing to do is to create an example text file. To do this we are going to use a builtin text editor to create a new file using the vim command. vim is an ancient text editor that is pretty much built into all machines that are based on UNIX which includes macOs and Linux (sorry Windows users). Into the terminal type vi my_text_file.txt. The command vim is used to open a text editor in your terminal and you have just used it to open a file called my_text_file.txt, and because the file doesn’t yet exist, you are creating it at the same time. This can be very confusing because it looks like an empty terminal window, as can be see below.

An instance of vim open in a Terminal.
The terminal is now open in an empty text file, and that is why it is empty and right now if you start tapping away at your keyboard nothing will happen, which is also pretty mysterious behavior. To edit the file and add content you need to press the i key on your keyboard. This activates “insert” mode in the vim text editor meaning you can actually type in the window and put content into the file. This will look like the below figure. Type in “Hello World!” then hit the esc or escape key on your keyboard and you will exit the insert mode, then type in :wq (that is hit Shift - ; and then type wq). Typing in wq means “write-quit” which is “write the file contents to memory and exit the editor”. To exit without saving use :q! instead of :wq. Once back to the normal terminal type in ls to check that the file is there, and then type in cat my_text_file.txt and the file contents will print out. The cat command (besides being a cute reminder of our Feline friends) stands for “concatenate and print file contents” and allows you inspect plain text files from the command line.
vim in ‘insert’ mode.
Though we are not going to be using vim extensively it is good to know how to use it, particularly considering how disorienting it can be when a program pops you into a vim terminal and you’ve never seen one before. All digital writing use to be conducted in things like vim, and other text editors, which refers to a class of programs that allow the user to create and edit plain text data. You can do could do nearly everything we are going to do in the working group with vim or an equivalent terminal based text editor. You could write a whole book in it if you wanted, or the documentation that you are looking at now (see the next figure).
A long document with lots of stylized text in vim.
Lastly, the terminal lets us take a look at hidden files in a directory. Do the exact same thing as you did above (where you created a text file called my_text_file.txt with “Hello World!” inside it) but this time when you first type in the vim command, instead of my_text_file.txt, type .hidden_file. Make the file contents the “Hello World!” phrase, same as before and write quit out of the file. Back at the normal terminal type ls again to make sure the file you just created is there. Curiously, you will not see a file called .hidden_file but the my_text_file.txt will be there! You can even check in a normal Finder window or File Explorer and the file will not be there.
(base) MacBook-Pro:plaintext timothyelder$ ls
my_text_file.txt
This is because files that begin with a period are hidden and do not appear without using a special flag or option for the ls command. Typing in ls -a will printout all the files in the directory, even hidden ones.
(base) MacBook-Pro:plaintext timothyelder$ ls -a
.			.hidden_file
..		 my_text_file.txt
There is nothing special about any given directory that you can navigate to on your computer. They are all generic containers that store generic files and so you can take what you have applied here and move up and down the directory tree, listing out the files and creating files as you please.
A Few Helpful Hints and A Warning#
When using the terminal if you ever need help with a command you can look up what’s called a man page, or manual page simply by typing in man <command of interest>.1 So if you want to read about everything the ls or cd commands can do simply type in man ls or man cd and the terminal prints out information that you can navigate through with the directional keys. If you need to exit a man page hit the q key on your keyboard.
Also, for the cd command you navigate into the directory that contains whatever directory you are in by typing in cd ... For example, above we created a sub-directory called plaintext in our Documents directory with two file in it. If you were in the plaintext directory and typed cd .. that would take you one level up to the Documents directory. Doing the cd .. command one more time takes you up another level into your home directory where we started out.
Lastly, the terminal is intimidating but hopefully some of its mystery has been resolved now that you can navigate around it list files out and make them all from the terminal. But, the terminal was made by computer scientists and engineers who were very technically capable and knew what they were doing, so when they typed in a command they knew what it meant and what it would do. Sometimes we can get ourselves into trouble on the terminal because we are not computer scientists and engineers and we don’t always know what we are doing. For example, the rm and del commands (in macOs and Windows respectively) delete files, and when you run them they don’t ask you to confirm that you really want to delete the file only_copy_of_my_thesis_do_not_delete_no_backups.tex and it doesn’t go to the Trash folder for you to restore it later. It just gets deleted. So use caution on the terminal but for the most part you can’t get into too much trouble.
Project Organization#
Working with the terminal requires and instructs you on the file structure of your computer, knowledge of which is important for keeping things organized while you do your research and writing. Project organization refers to two separate, and sometimes competing tasks: one is organizing the material you need to learn about the world in a way that is conceptually coherent and helpful to you. The second task is organizing actual computer files in such a way that they are accessible to you and to the software you are working with. These are distinct tasks and sometimes they compete with one another, as the first is meant to help you think better and the second is meant to help you do things faster. For example, it makes sense to keep distinct activities related to your research into different directories (sort of like keeping one notebook of notes for one class, and another notebook for another class). But depending on what your definition of an activity is, could mean that the number of directories proliferates and becomes unmanageable. You could just have one directory that has all the files for your project in a horizontal structure, which makes remembering the paths to each file pretty simple (it would just be /Users/timothyelder/Documents/project-dir/FILENAMEHERE.txt). That makes everything accessible but pretty hard to navigate.
Finding a healthy compromise between the conceptual ordering of research material and the organization of computer files will be a matter of personal preference. With that said I have a few principles that I find helpful:
Each project should have its own directory
A project can be as small as a side-project that goes nowhere, to your dissertation to your magnum opus.
Each Area of a Project should have its own Sub-Directory
Again what constitutes an “Area” is ambiguous and you have to use your own judgement and the final rule of thumb is if you are making progress and getting things done. With that said I usually end up having the same directories at the top of my project directory. These include the following:
timothyelder@MacBook-Pro project-dir % ls
README.md
research_log.md
analysis
data
drafts
figures
memos
misc
scripts
The two files at the top of this list are what are called Markdown files (which we will cover soon). The README.md file includes an explanation of what the project is and what it includes, and any required software while the research_log.md includes entries about what is going on in the project and my laments about the world and my own research. The rest are sub-directories that contain different parts of the project. In the data directory naturally is all my data (both quantitative and qualitative), while the drafts directory has all the drafts for the different formal pieces of writing coming from the project. Informal pieces of writing that are likely only to be seen by myself, my advisors, or collaborators are stored in the memos directory. figures includes all the images that are generated from the data or that might be included in papers etc.. Whether the project is purely qualitative or not, I inevitably write some scripts in R, python or shell and they go in the scripts folder and misc is a garbage can of all the things I don’t need now but am not confident I will never need again.
Hierarchical is Better than Horizontal
This goes hand in hand with the first two points but I want to emphasize that creating directories and subdirectories is helpful for keeping everything organized and that nesting directories is particularly helpful as it allows for more and more fine grained conceptual categorizations.
Literal is Better than Symbolic
There are only two hard things in Computer Science: cache invalidation and naming things.
— Phil Karlton
When you are naming directories and files, it is always best to make things explicit. If the directory holds data call it data, the directory contains images of documents from the Florida Office of Insurance Regulation in Tallahassee, call the directory images_florida_insurance_regulation. If the file is your dissertation latex file call it dissertation.tex. Choosing symbolic names, or anything cryptic makes parsing files difficult particularly if you take a break from a project for a few weeks and need to get back to it.
IMPORTANT NOTE: It is really important that when you are naming things, including files and directories, that you don’t use spaces or slashes in the names. This is because spaces and other characters like slashes are read by your computer as meaningful to how it reads different files. If you use them then errors will be raised and things won’t work.
Summary#
The wisdom then for organizing a directory in a way that successfully achieves the two different goals of organization (conceptual clarity and organizational productivity) can be condensed into:
- Project in Every Directory and a Directory for Every Project
- A Sub-Directory for every Area of a Project
- Hierarchical is better than horizontal organization
- Literal names are always favored over cryptic or symbolic names
This is an area that is going to be much more dependent on your particular disposition to doing work, but at a certain point you will run up against the need to typeset documents and keep conceptually distinct areas actually digitally distinct, so if you don’t buy into my dogma that is fine, but adopt some other regular process of your own and stick to it as you do your work.
Some Examples#
Here are some examples that exemplify and defy the paradigm I articulated above. All of these are examples from my own computer and time in graduate school. The below figure is the directory that contains all the files for my Qualifying Paper, my first independently researched and written paper from graduate school. You will note two things: I was doing all my writing with Word and didn’t abide by my rules about keeping different directories for different areas of the project. I do this a little bit having a drafts directory but I am not certain what the Print and Material directories are and the Writing Seminar Submission directory should probably be in drafts.
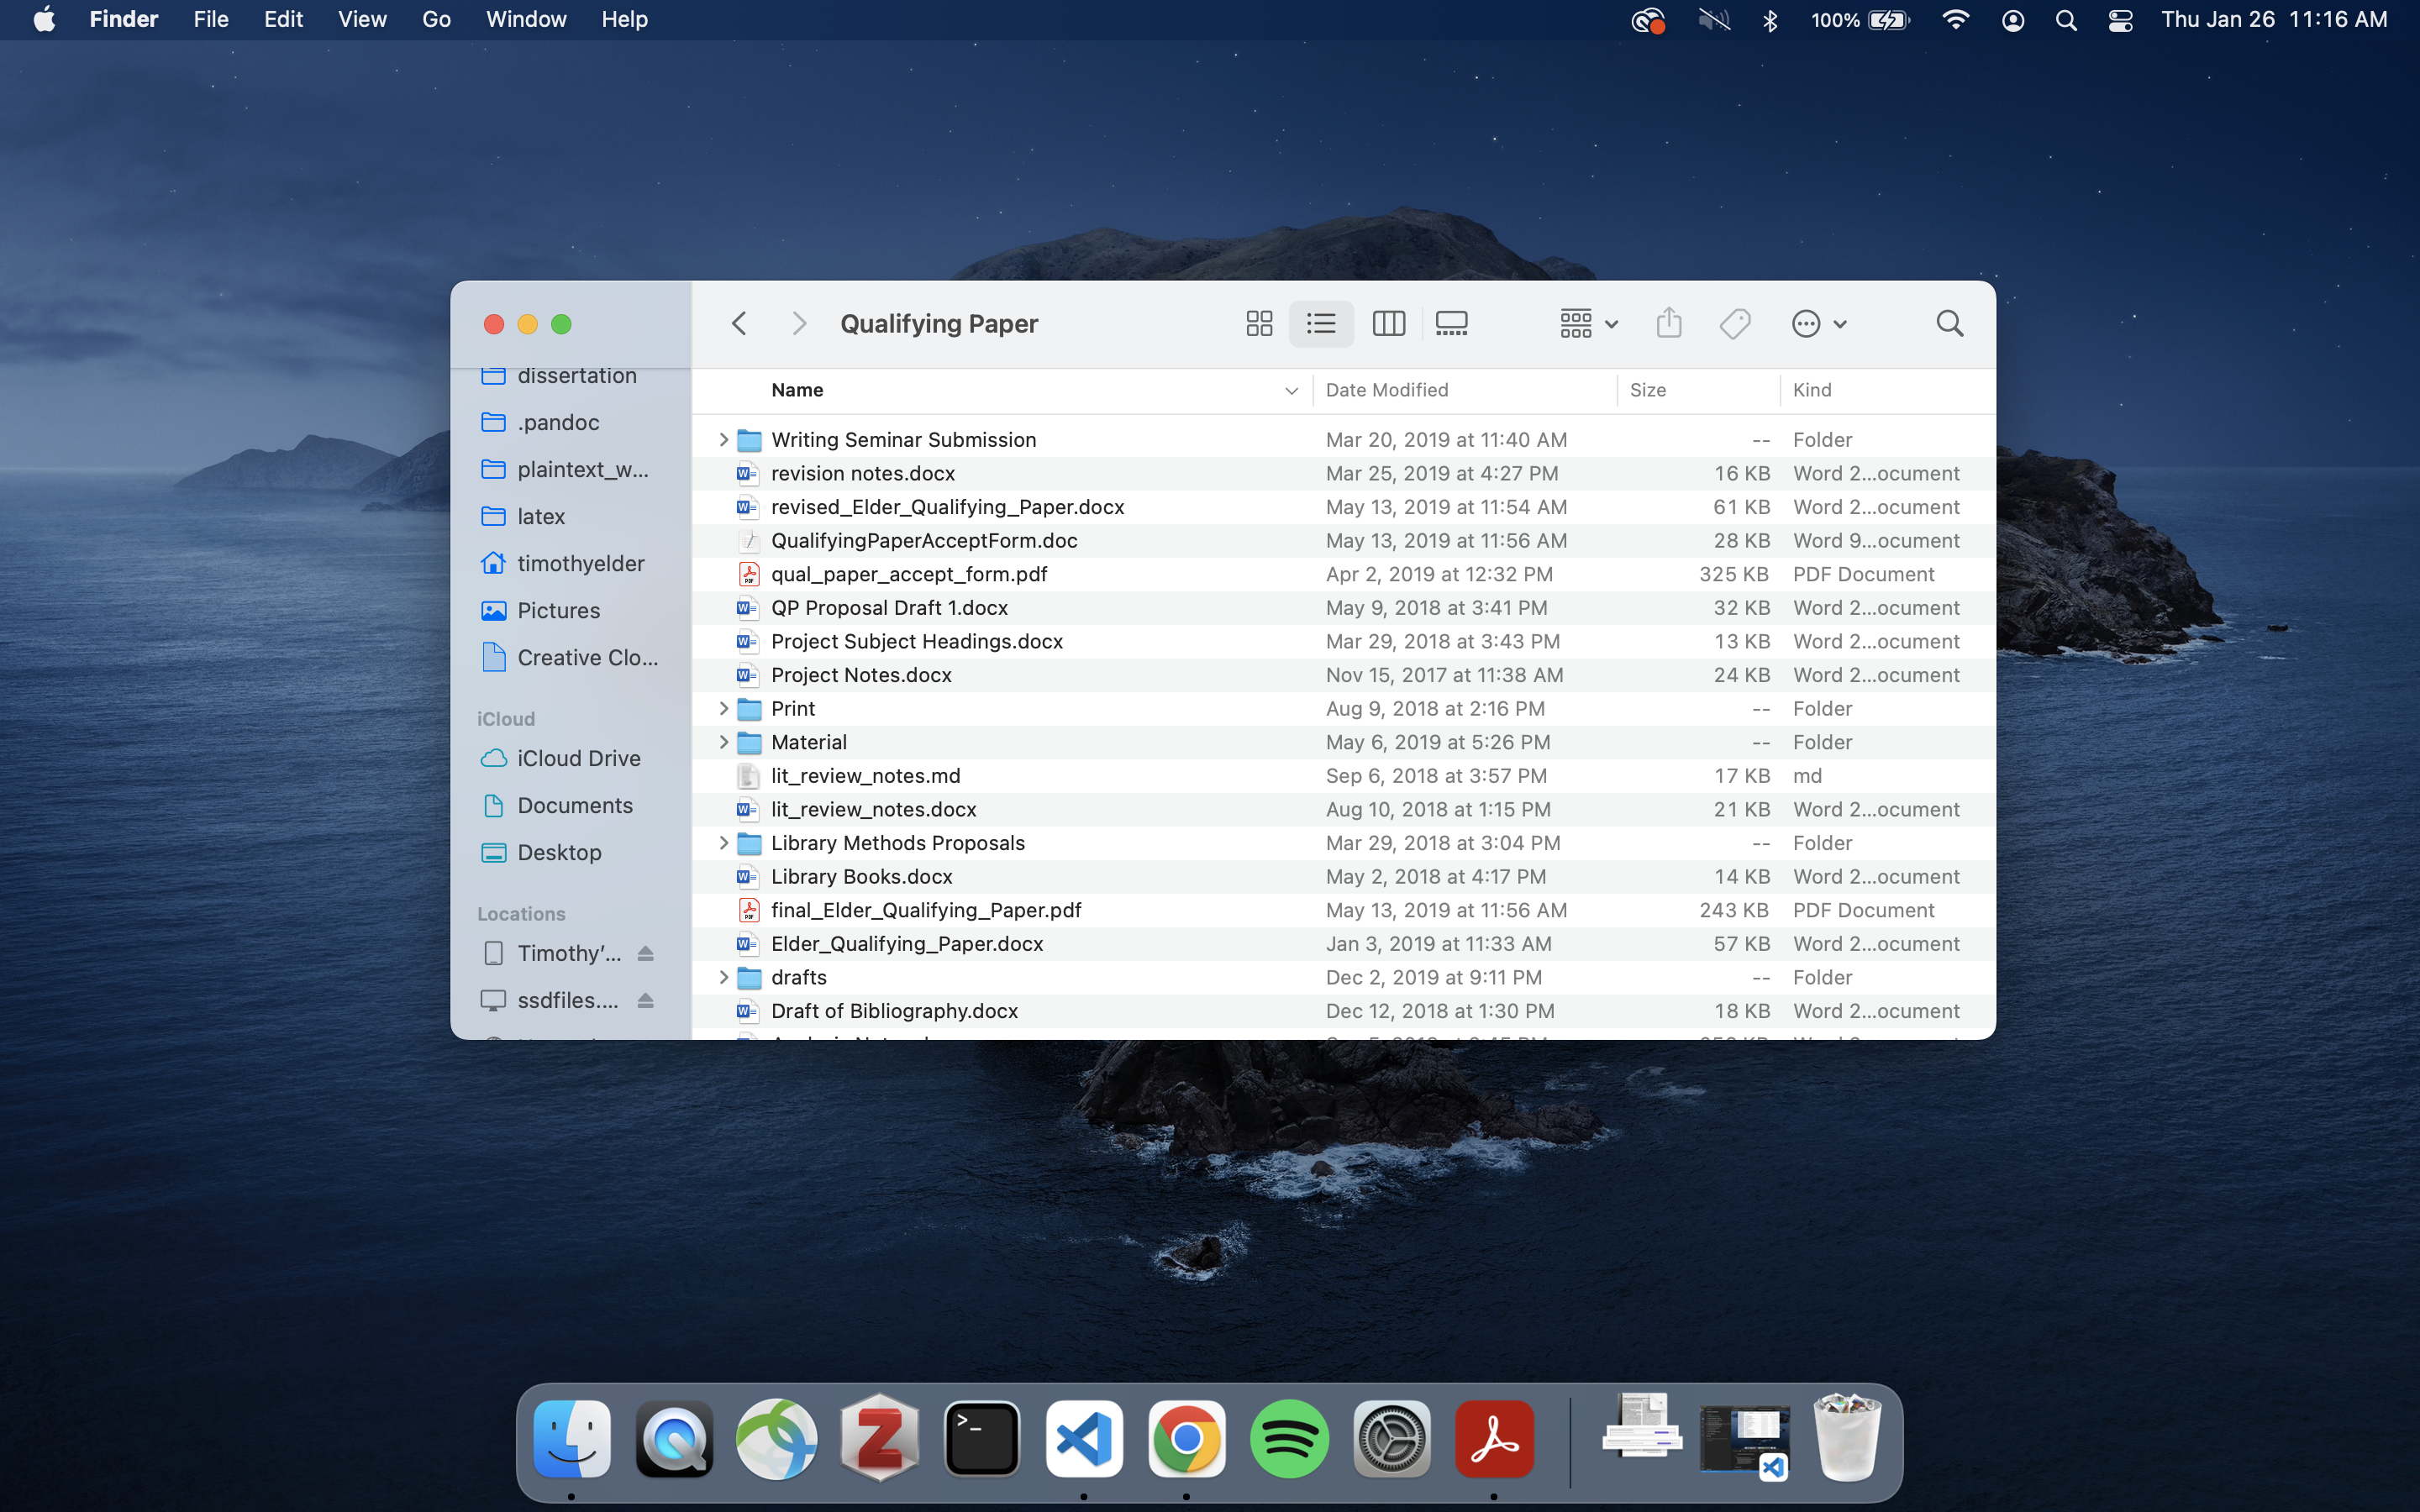
A pretty poorly organized directory.
Clearly, I was not being very thoughtful when it comes to how I organized my work, but this is a lot better than the directory in the figure below. This is a directory for class prep for a sociology course I helped to design along with Profs. Jenny Trinitapoli and John Levi Martin. It is a complete mess with obscure directory names and files that are all at the top of the directory without much organization at all. Files are misspelled and there is a particularly egregious organizational error. I have two files that are indistinguishable in their name except for the suffix “.v2” being included in the file name. A short anecdote will heighten the importance of the naming conventions I articulate here.
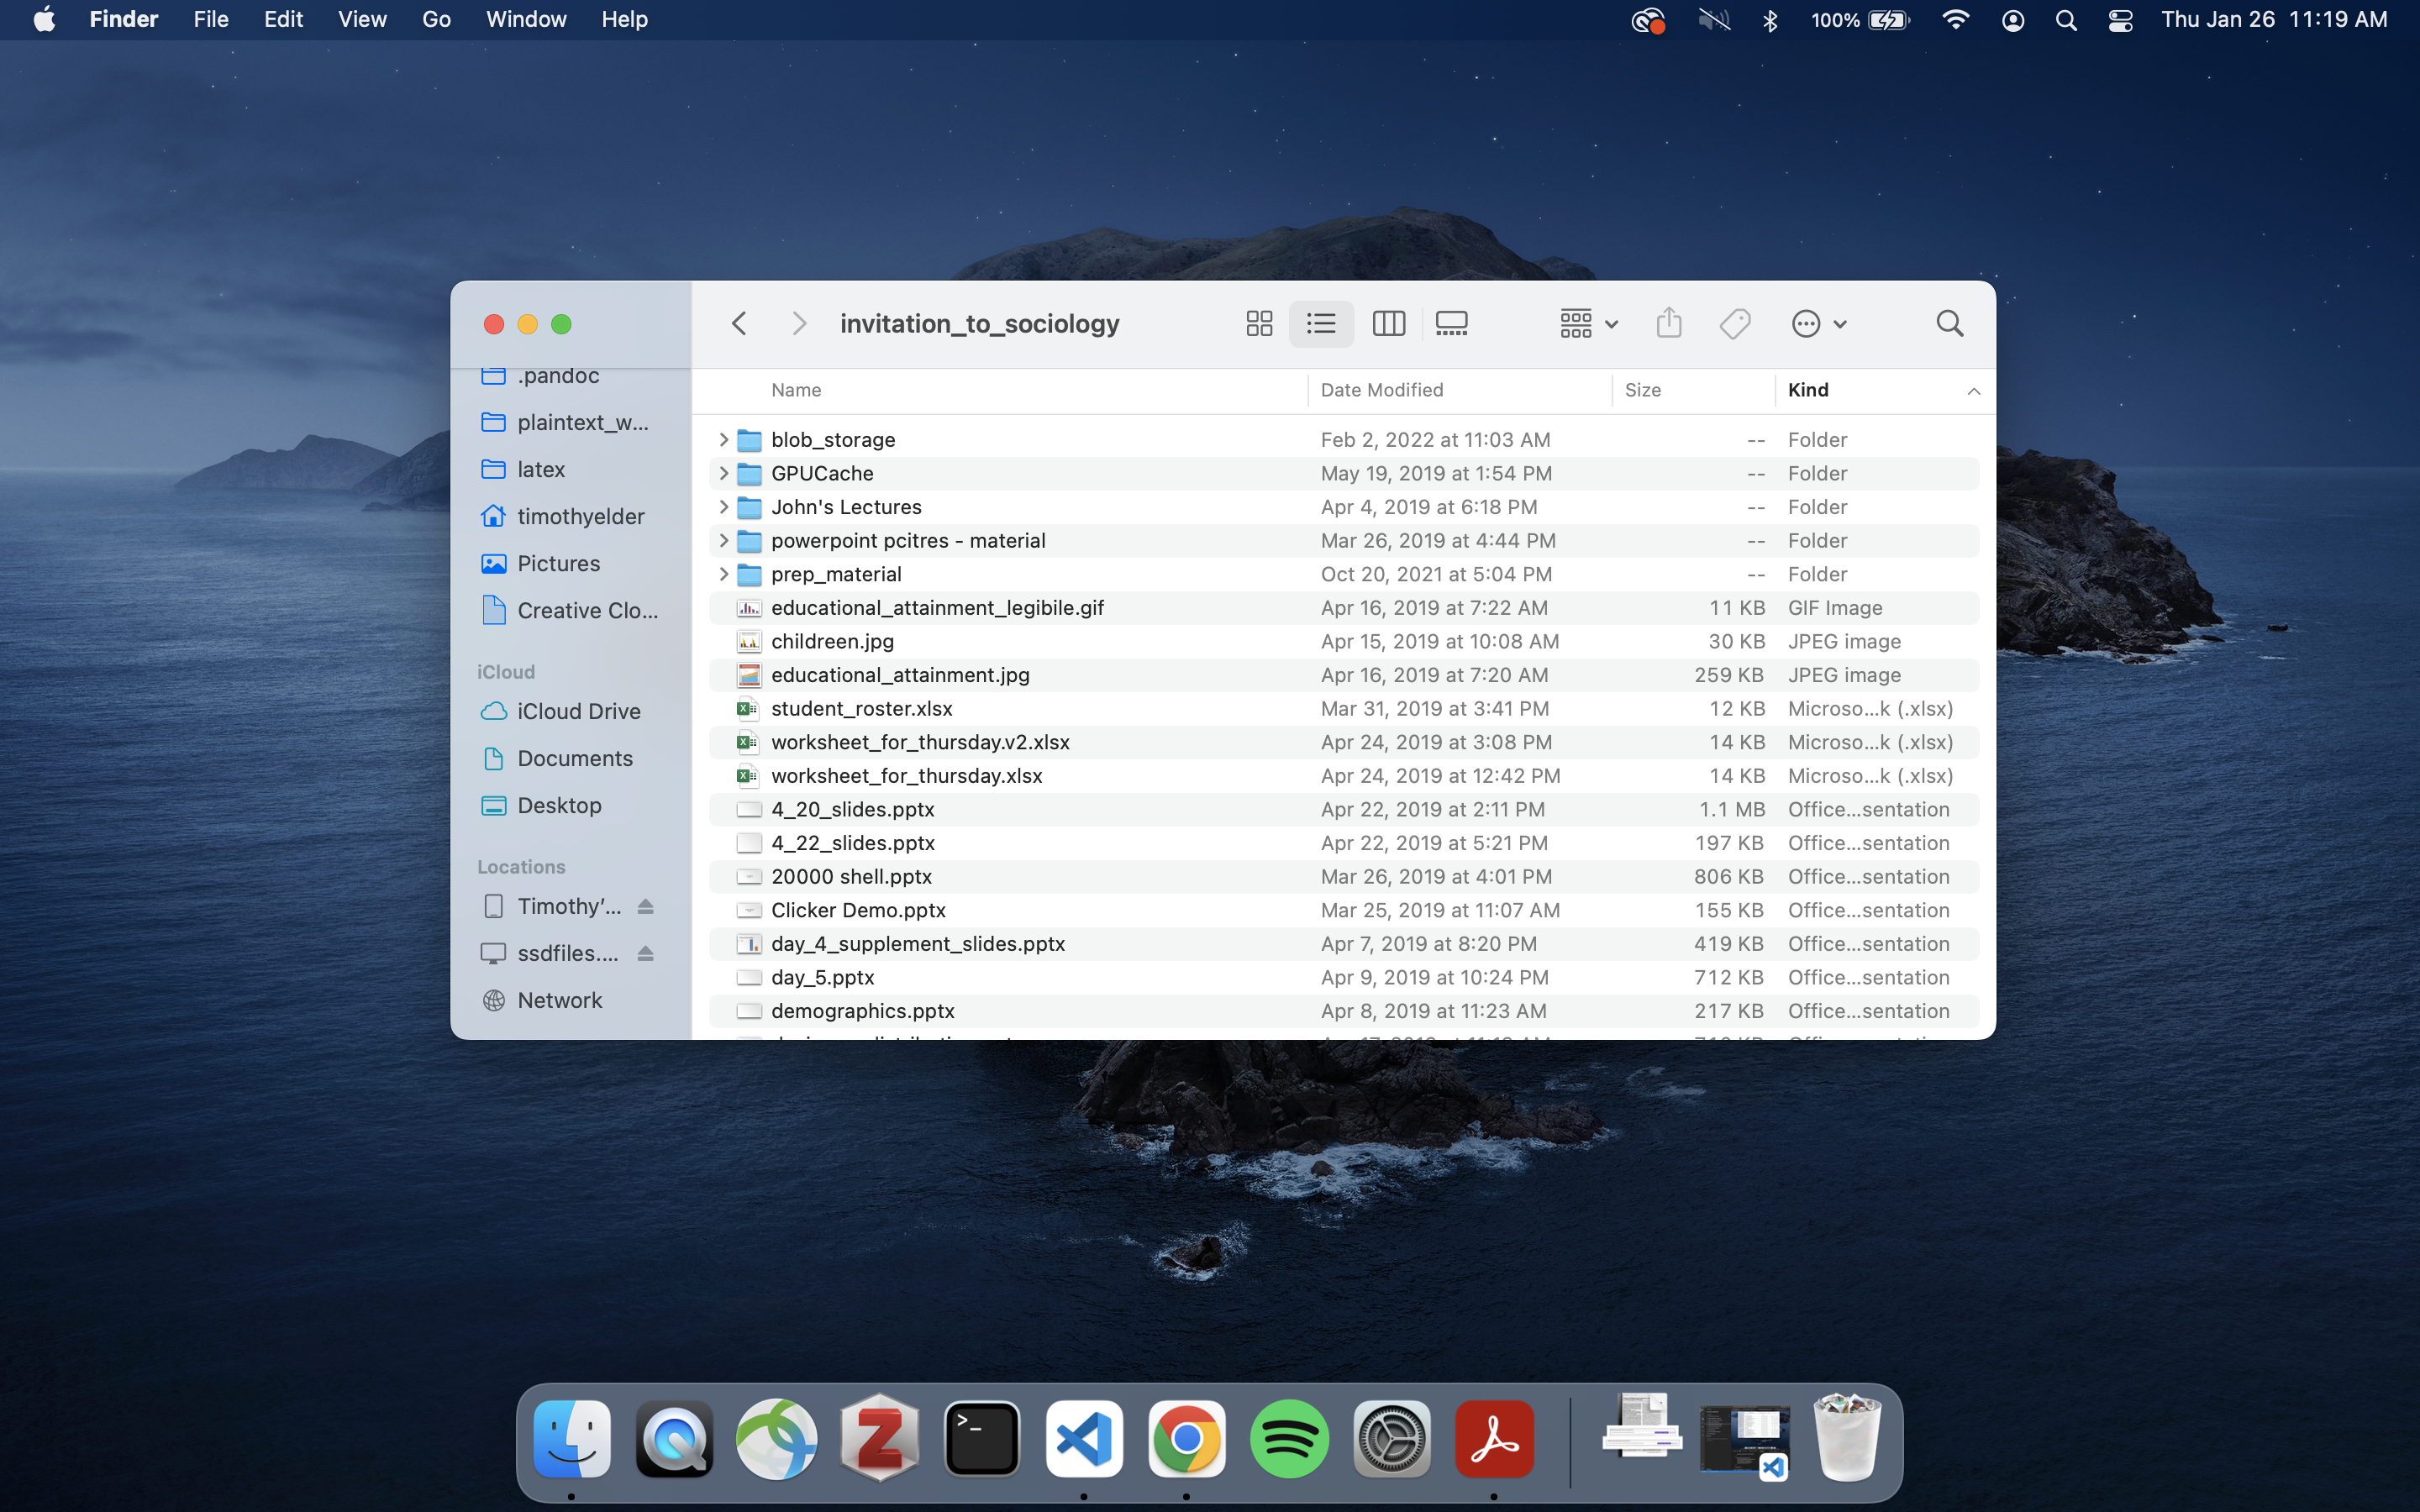
A really quite poorly organized directory
I have a colleague who has had a paper under review for a couple of years now due to a variety of factors related to the pandemic. On the second R&R, after months of working on other projects and getting ready for job talks, he went back to the project files to address the concerns of a particularly scrupulous Reviewer #3. The reviewer was asking that they re-run some analyses with a different method and so my colleague needed to go back and figure out how a few figures were generated and how the original analyses were specifically conducted. Opening the directory with his code he had endless files all with nearly indistinguishable names like:
pol_gss_multiimput.R
pol_gss_multiimput_v2.R
pol_gss_multiimput_v2_1.R
pol_gss_multiimput_v2_2.R
pol_gss_multiimput_v2_2_THIS_ONE.R
pol_gss_multiimput_v2_2_No_REally_THIS_ONE.R
pol_gss_multiimput_v2_2_No_REally_THIS_ONE_final.R
He spent weeks and lots of tireless hours figuring out what was what. Instead of being like my friend, be more like me and do something like you see in the figure below. This is a directory for a project that I am working on that includes lots of different scripts and data. Code for processing the data is kept separate from code for doing analyses and files are given explicit and non-redundant names. Certainly, this takes some amount of effort and energy to do and my project directories don’t always look like this while working on them, but it is worth cultivating good habits like this to do your research and writing. You will thank yourself later if you are ever in the same position as my poor sweet friend being harassed by pesky Reviewer #3.
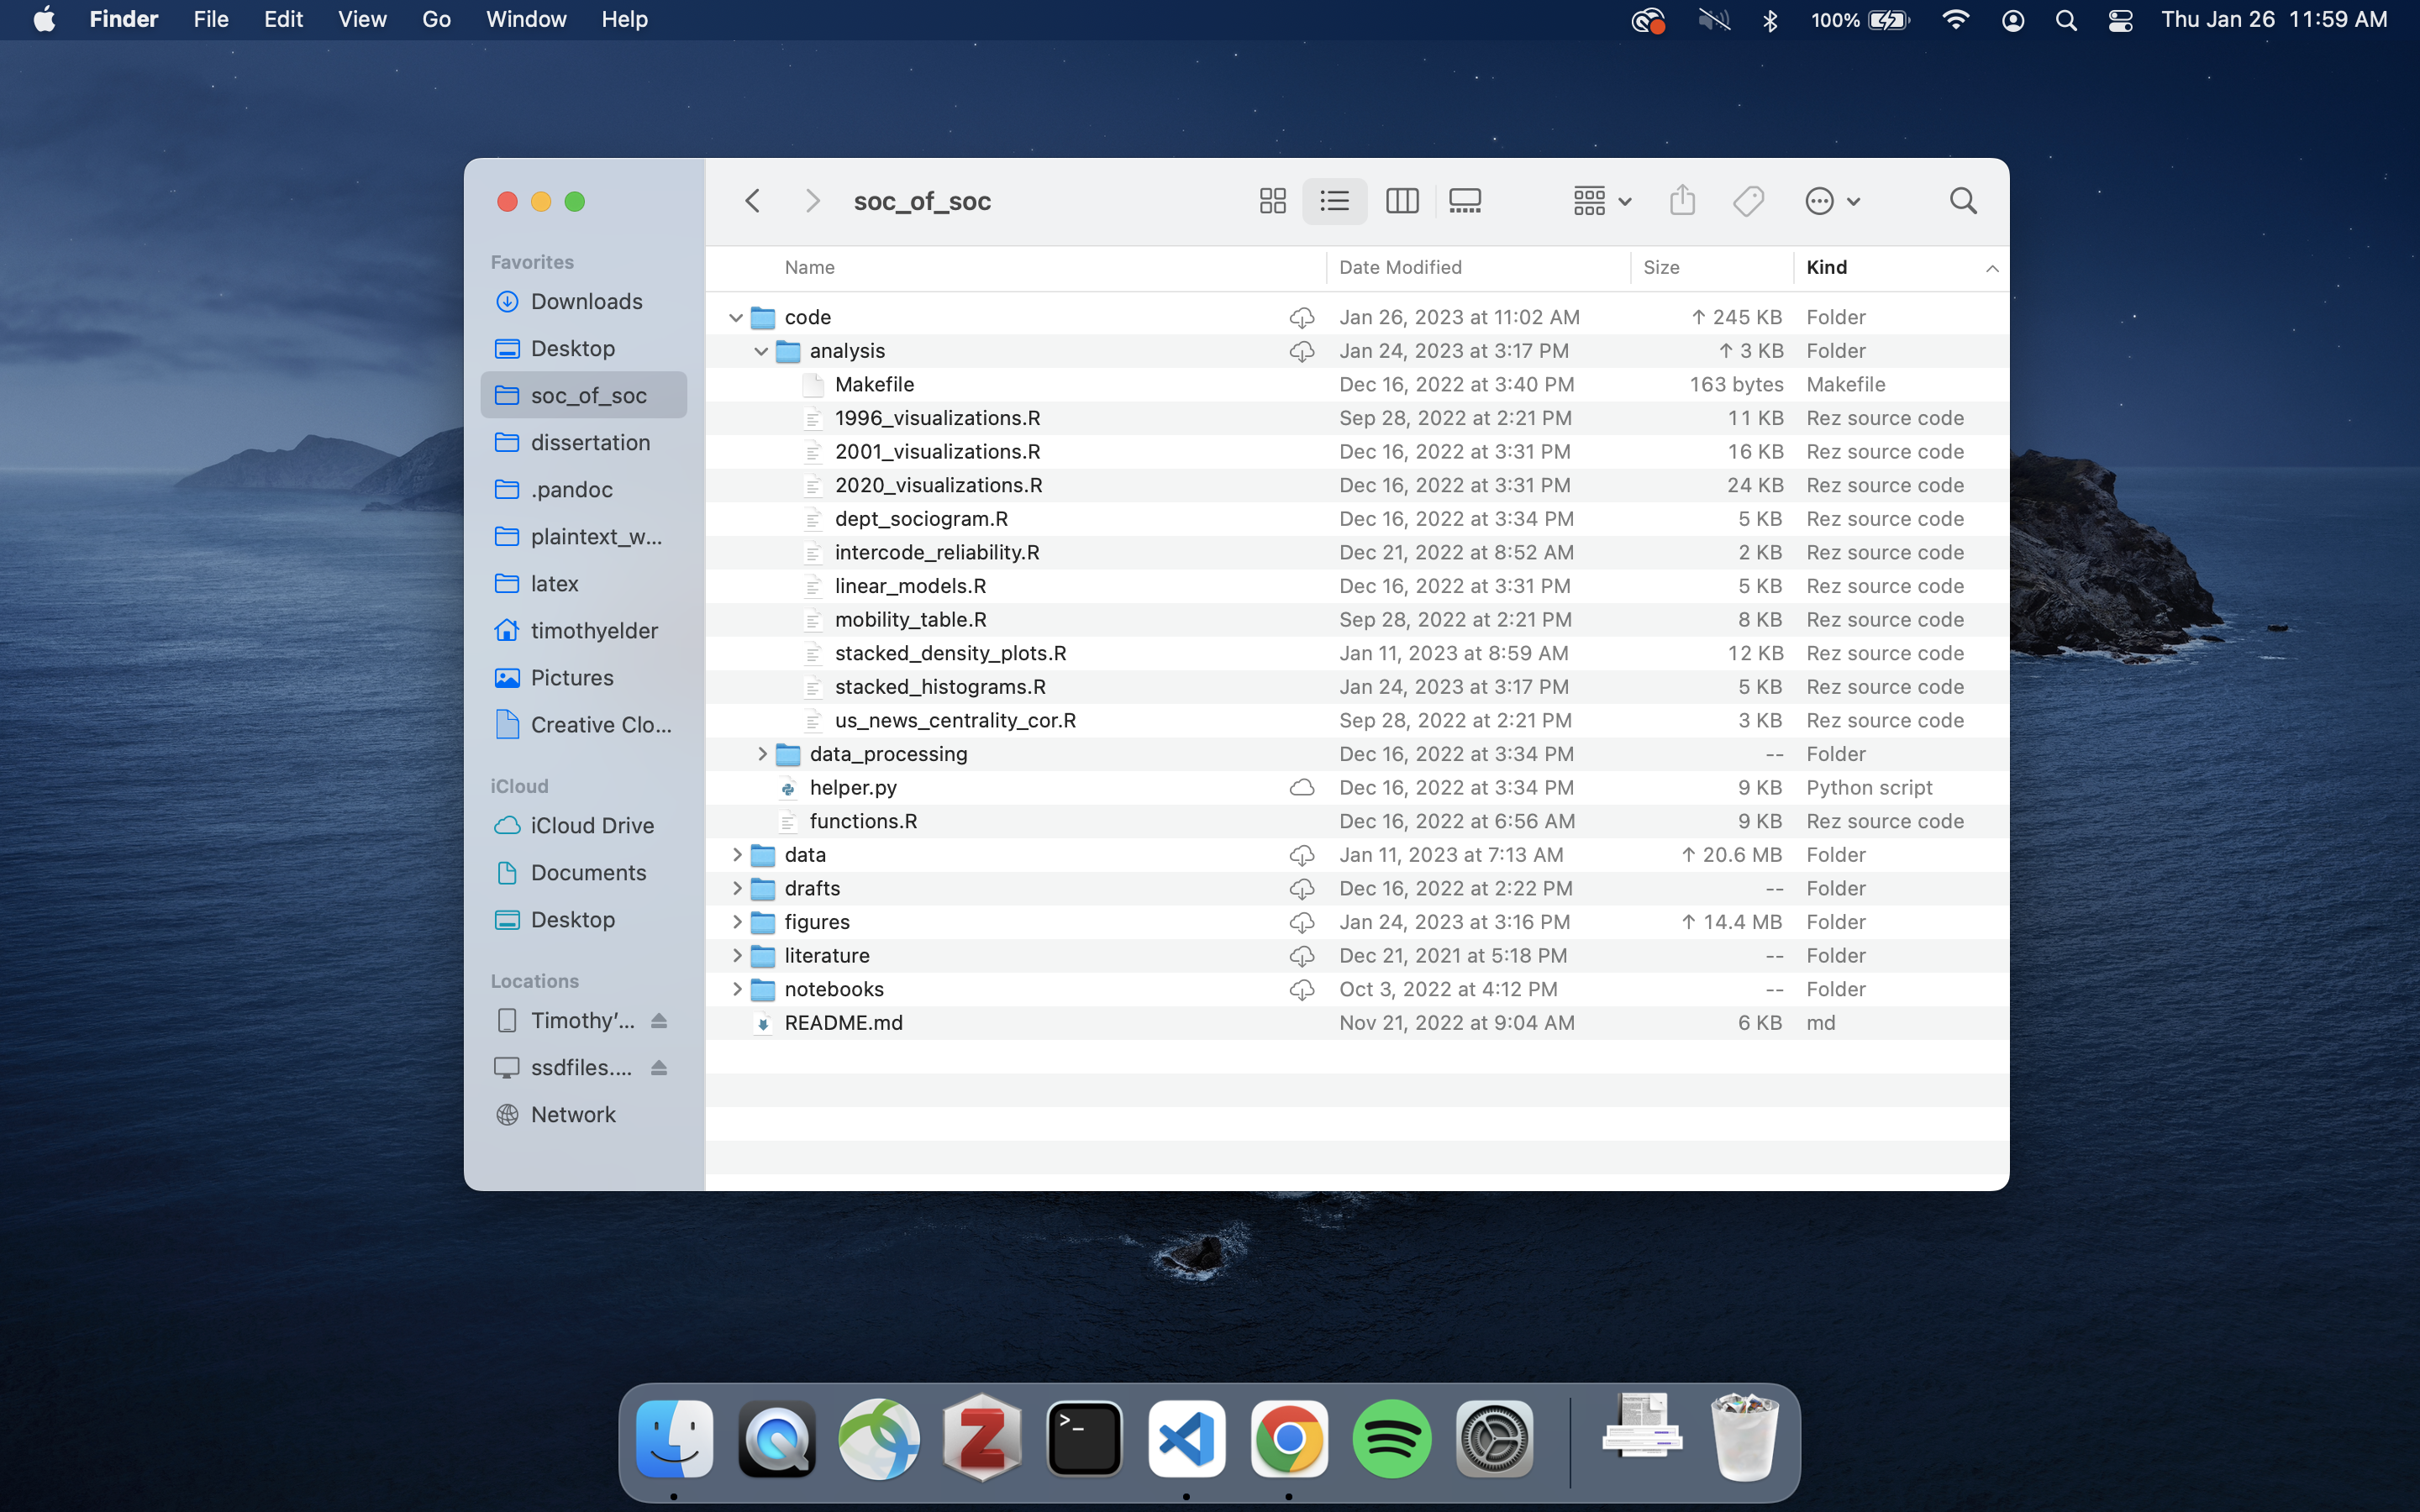
A quite well organized directory
-
Windows Users: Use
helpinstead ofman. ↩︎