Document Composition with LaTeX, Markdown, and pandoc
Using LaTeX, Markdown, pandoc
Now that you are familiar with the Terminal you are ready to begin addressing the core competencies of the PlainText Working Group. The essential workflow that we are adopting here is writing in Markdown, a simple markup format with a few extra bells and whistles, and then using the pandoc program to convert these into HTML, PDF, Word, and LaTeX files. We will not be, strictly speaking, working or writing in LaTeX, but using LaTeX templates and the underlying software to typeset our documents.
With that said, you will need to know what a LaTeX document looks like and how to work with one. Once you have a feel for the LaTeX document setup, you will be able to create your own document templates for pretty much any use. For example, I have LaTeX templates for memos, letters with my contact and university affiliation, article drafts, class handouts, single columned general prose, double column general prose, and even the documentation you are looking at right now was created using this workflow.
LaTeX#
LaTeX at bottom is something called a markup language, or a means of encoding text where different characters are used to designate structure, formatting and style. So where in Word you would click the little italics button to make text italics, in a markup language like LaTeX you wrap the text you want to be italicized with the command \textit{}. This is the fundamental difference between a What You See Is What You Get document work flow, such as Word, where you are composing and editing the text on your screen and the plaintext work flow. In a markup language, you are writing out all the commands that will instruct your computer to create the proper formatting and style, rather than this being done for you by the program under the hood.
LaTeX is notorious for being unintuitive and hard to pickup and is the bane of any graduate students existence when they take STATS102 for the first time. The thing about LaTeX is that it is complicated and unintuitive but there are only a few complicated and unintuitive conventions to understand before LaTeX seems a lot clearer.
Below is an example of the simplest LaTeX document you can make, and examining it helps us to begin to understand two important parts of the paradigm we are adopting: (1) what a Markup Language is and (2) the conventions used in LaTeX. Here is an example of the bare minimum you need for a LaTeX document:
\documentclass{article}

\begin{document}

  Hello World!

\end{document}
In LaTeX, anything that begins with a backlash “\” is a command, and commands usually have brackets at the end to take in some options. You can think of working with a LaTeX document like working in narrower and narrower environments. In any document, you first need to declare the kind of document you are creating with \documentclass and then declare the beginning of the document with \begin{document}. The \documentclass command creates the underlying environment in which you will be composing, before the \begin{document} command creates the environment in which the prose and content of your document will go.
The convention of open and closing environments applies to most features of a LaTeX document. We open a document with \begin{docuemnt} declare the end of the document with \end{document} while a figures or images in your document need to be between the commands \begin{figure} and \end{figure} and the same is true of tables, which go between\begin{table} and \end{table}. The body of your document can be 2 words or 200 pages worth of content, and I simply use the “Hello World!” document as an example. You could make that document your self in a matter of seconds.
The \documentclass command specifies how the document will be formatted and loads a set of default settings. There are a variety of options to choose from depending on your need but include such things as article, book, report, slides, and letter. A very common document class that you’ll see is memoir which is used for general prose writing. This command can take in options to further specify the formatting of your document and usually includes things like the paper size, whether it is one or two sided, font size, among many other things. Here is an example where we are setting a document to have 11pt font, be one sided and use formatting for an article type document, using all the bells and whistles from the memoir document class;
\documentclass[11pt,article,oneside]{memoir}
Another convention in LaTeX is to declare metadata and other information in the preamble of the document. The preamble is the part of the file that is above the \begin{document} command. In the above example the preamble includes only the \documentclass command but you can do a lot more here including telling LaTeX about all the formatting of your document as well as loading any packages that you will be using to create your document. Also, you can declare metadata in the preamble that then will appear in your document such as the author name, title of the document, abstract, date, and pretty much anything else. Here is another simple example:
\documentclass{article}
\title{My First \LaTeX Document}
\date{1/1/2023}
\author{Talcott Parsons}

\begin{document}

\maketitle

Hello World!

\end{document}
The \title, \date and \author commands are components of the \maketitle command that you can invoke after you begin the document to create a well formatted title block for your document. The above code renders a document that looks like the figure below.
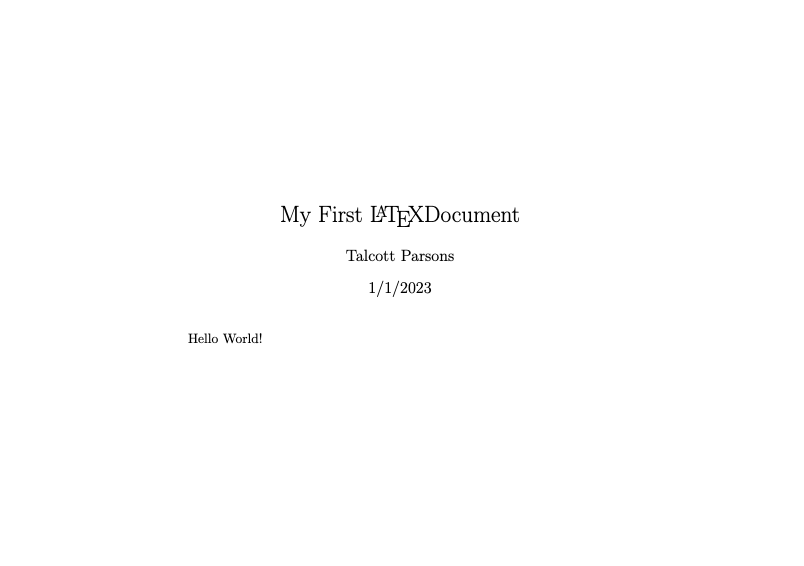
Your first document made with LaTeX
As mentioned above, the body of the document (here it is just “Hello World!”) can be as long as you want and encompass all sorts of different things that are particularly helpful to social scientists who write documents that use data to make an argument. For example, and we will cover all of these shortly, you can include tables, figures, citations, theorems, proofs, equations, diagrams, code blocks, and any number of other information that you want typeset in a beautiful way.
To summarize here are the important parts for understanding a LaTeX document and markup languages in general. Remember to:
- Declare the beginnings and ends of environments in which different formatting or content is located.
- Include metadata and package calls in the preamble of the document.
- Render formatting using commands like
\textit{}or\textbf{}
Learning the exact conventions of LaTeX is a task that is worth exploring. If you want to be a truly autonomous plain text writer and researcher, you will have to learn more about LaTeX so you can create your own templates. But, if you want to stick to thinking and writing then you’ll need to know more about the accessible alternative to LaTeX: markdown.
Markdown#
Markdown is a much easier to learn and intuitive markup language than LaTeX and is becoming more and more ubiquitous. In Markdown, italicized text is created by wrapping the text in *asterisks*, while bold is done with **two asterisks**. There are certain limitations to markdown; for instance there is no underlining in Markdown so you have to get by with the other ways of styling text. Here is an example of some text in markdown before being typeset:
# Header 1
You might have some introductory comments
## Sub-Header
Some text with different styling such as *italics* and **bold**.
Remember there is no underlining which is old fashioned anyways, but
you can insert [Hyperlinks](https://en.wikipedia.org/wiki/Hyperlink)
and create tables:
There are also other important aspects of academic writing.^[Like footnotes that are rendered at the footer of the page in which they appear.]

The good thing about Markdown is that it is much easier to use than LaTeX so instead of messing around with a document preamble, document classes, and style files you can get straight to writing your document. I am not going to cover all the different markdown conventions in this documentation but you can find them here. Markdown is pretty straight forward but you will still want to take advantage of all the fancy features of LaTeX while maintaining the usability and ease of Markdown. Luckily, someone already thought up this idea and created the program pandoc.
pandoc#
pandoc is a command line based program that allows you to convert files between different file formats. It is a pretty powerful program because it will take the markup conventions from one format and translate them into another. So, when you write your next article in markdown and really emphasize some part (“And to reiterate again, it is the Lumpenproletariat that ultimately must be motivated by a vanguard party to seize the means of production from the Petty bourgeoisie.”) pandoc will convert the text surrounded by *asterisks* (which indicates italics) and converts them to an \textit{} command. pandoc is the key link in the workflow that allows us to convert our simple markdown files into LaTeX files and then into PDFs and how we are able to accommodate the different resources we need for academic writing, like bibliographies, footnotes, tables, figures, and diagrams.
The basic usage of pandoc looks like the following:
pandoc my_doc.md -o my_doc.pdf
On the left, directly after pandoc is the markdown file that we want to convert to a PDF file. The -o flag indicates that the my_doc.pdf file is in fact the intended output document from the input. That is pretty simple, but so too will be the output PDF. Compare the line above to this one:
pandoc my_doc.md -o my_doc.pdf --from=markdown --template=/Users/timothyelder/.pandoc/templates/eisvogel.latex --listings --filter pandoc-xnos
That is the command for rendering the document your are looking at right now. It does the same thing that we saw above, specifying an input file and then an output file, but it includes all sorts of extra flags that indicate how to handle different attributes of your document and the proper formatting for the output. The --from= flag makes it perfectly explicit to the software what the input format is (in this case it is markdown), while the --template= flag tells the software where to look and which template to use when rendering the output. The final two flags (--listings and --filter pandoc-xnos) indicate the style for code blocks (those shaded areas that display computer code throughout this document) and how to cross reference different parts of the document respectively.
It is important to get clear on what is actually going on when we use the pandoc command to create a PDF. What we are doing can be seen in the figure below.
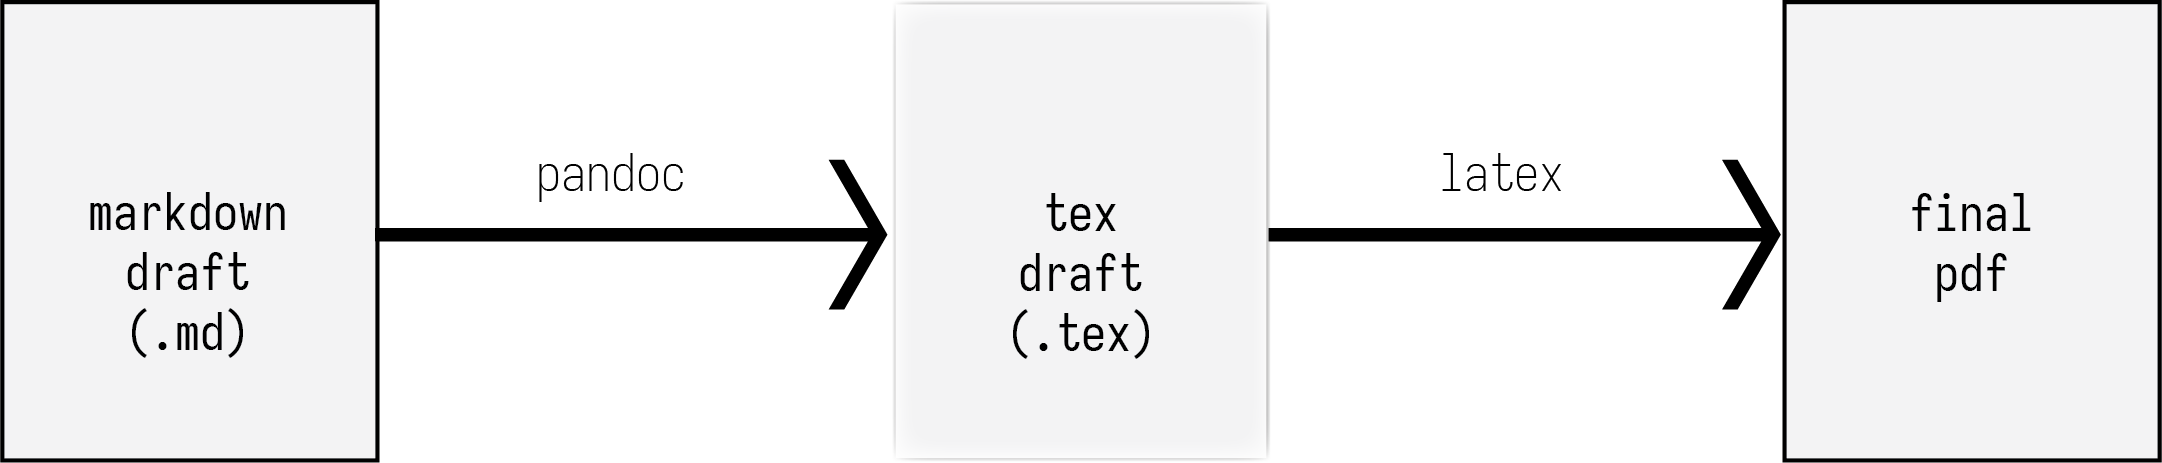
Writing in markdown and typesetting into a pdf with a tex intermediate step.
We write our files using the conventions of the markdown format (indicated by the .md file extension) and then use pandoc to typeset these into a PDF. pandoc is not a typesetting software itself per se but relies upon LaTeX to typeset into PDF. When you invoke pandoc to create a PDF, pandoc performs a quiet intermediate step where it creates a LaTeX copy of the markdown document (the .tex file in Figure {@fig:md2tex2pdf}) and typesets that into a PDF by invoking the LaTeX program. pandoc is super smart, and understands how to translate the conventions of one markup language into another, and that is how we are able to write in Markdown (with all its simplicity and speed) while still taking advantage of all the power of LaTeX.
We are able to add a few bells and whistles to pandoc to define the specific formatting of the document. We do this partly by manipulating the characters and conventions in our document directly, but also outside our document, by invoking templates and style files that you can install. This can be seen in this figure.

There are a few extra little dependencies.
Make#
It can be very annoying to continually run the same lines of code over and over again, when you are nearing the completion of working on some document, particularly if you are obsessive and neurotic and messing with some minor part of a paper that you want to get perfect. A very helpful resource that computer scientists thought up was to create a system for handling running code called Make. Make automates the process of, for lack of a better word, making things. This is somewhat advanced when it comes to typesetting documents so if you want to skip this part or skim that is totally fine. I will note that this tool will be particularly helpful if you are a quantitative scholar and have different scripts that handle the creation of data, figures, or tables etc. etc.
Make is particularly powerful because it has a system for checking whether or not a given output file needs to be changed given some change in the input file. For example, say you have a recipe (recipes in Make are the different commands that you want it to run) that creates your document that looks like this:
## Location of Pandoc support files.
PREFIX = /Users/timothyelder/.pandoc

## Location of your working bibliography file
BIB = /Users/timothyelder/Documents/bibs/socbib-pandoc.bib

## CSL stylesheet (located in the csl folder of the PREFIX directory).
CSL = asa

dissertation.pdf: dissertation.md
	pandoc -f --pdf-engine=xelatex --template=$(PREFIX)/templates/ucetd.template --top-level-division=chapter --filter pandoc-xnos --citeproc --bibliography=$(BIB) dissertation.md -o  dissertation.pdf
To typeset the dissertation.pdf file given the recipe in the Makefile, you would simply type into the terminal with the Makefile, make dissertation.pdf and the recipe runs. Make will check to see if any changes have been made in the name of the prerequisite file (the dissertation.md file) which is used to make the PDF. If no change has been made to the markdown file, then Make will let you know and say make: Nothing to be done for 'dissertation.pdf'.
When you run “pdf”, a couple of python scripts get run in a particular order, then an R script, and then a pandoc line runs and then a shell command. That would be a lot of keystrokes on your own but make does it auto-magically. This is actually a recipe that I have because I have a project where we generate all the data from optical character recognition of JPEGs, and then carving up big plaintext files with regular expressions. Sometimes the underlying data changes because we notice there is some error in the plaintext file and we have to regenerate a whole bunch of CSVs from the plaintext files. What make does is it checks the various pieces of data that you are asking it to use and that you want it to make, and checks whether or not they have changed at all since you last ran Make, and it only runs precesses to update pieces of data as needed. So if you keep running Make without changing anything it will tell you “nothing to update”.
Document Composition in Markdown#
In this section, I want to explain how you put together the various pieces that we have up to this point only been reading about. We are going to be covering:
- Inserting figures
- Creating tables.
- Including math, both numbered equations and inline math
Writing the Document#
This part is pretty self explanatory. You type characters, which form words, words create phrases and sentences, and you keep doing that until you have something that looks like a defensible argument. Once you have that, you put in all the nifty evidence that you have discovered to support your argument and there are all sorts of things that go into that.
Headers and Metadata
Where in a LaTeX document you put metadata such as the author name, date, title, abstract, etc. in the preamble of the document, in markdown you use what is called a YAML (yam-mul) header. Since you don’t want the metadata being represented in the document as it is, you need to contain it in special characters (sort of like how you create an environment in LaTeX with \begin{} and \end{}). Three dashes opens and closes your YAML metadata header like this:
---
title: My First Markdown Paper
author: Timothy Elder
date: February 17th, 2023
---
The information that the YAML header contains is arbitrary though there are a few standard entries like “author”, “title”, “date”, and “abstract”. Because pandoc translates your Markdown document into LaTeX before typesetting, you have the full arsenal of LaTeX options available to you, which means you can change the font, margins, headers and footers among many many others. Too many to cover here but you can review the full set of options in the pandoc documentation here (see the section “Variables for LaTeX”).
Figures
A figure or image in a markdown file can be included with the following notation:
{@fig:example-crossref-label}
The image will render on the page around where you insert the line but you will not have exact control over it unless you go edit the intermediate .tex file. In our templates we specify some options that help images render in an attractive way and LaTeX uses an algorithm for image placements when not manually placed. Instead of manually numbering figures and referencing them in the body of your paper, you assign them a label, which follows the call to the image, wrapped in curly brackets with the @fig: prefix. Rather than having to keep track of how your figures are numbered, when you want to reference the figure in the body of your paper, you do so like this:
Here I am explaining the really impressive figure that I made that is going to definitively demonstrate some strong association between two variables. This can be seen in Figure @fig:example-crossref-label.
This means of cross-referencing figures is really convenient especially when you decide to reorder your paper, and suddenly figure #5 is where figure #1 was and all the labels would have to be manually changed if you were using something like Word.
Tables
Tables are pretty easy in Markdown and can be styled different ways. This is a pretty bare bones table:
| Character | Height (cm) | Mass (kg) | Homeworld | Species |
|---|---|---|---|---|
| Han Solo | 180 | 80 | Corellia | Human |
| Wedge Antilles | 170 | 77 | Corellia | Human |
| Yoda | 66 | 17 | NA | Yoda’s species |
| Ackbar | 180 | 83 | Mon Cala | Mon Calamari |
| Mace Windu | 188 | 84 | Haruun Kal | Human |
This table is created with the following code:
|   Character    |  Height (cm) |  Mass (kg)  | Homeworld  |     Species     |
|----------------| -------------| ------------|------------|-----------------|
|    Han Solo    |      180     |      80     |  Corellia  |      Human      |
| Wedge Antilles |      170     |      77     |  Corellia  |      Human      |
|      Yoda      |      66      |      17     |     NA     |  Yoda's species |
|     Ackbar     |      180     |      83     |  Mon Cala  |   Mon Calamari  |
|   Mace Windu   |      188     |      84     | Haruun Kal |      Human      |

Table: Some information about Star Wars characters. {#tbl:id}
You will be able to output from most statistical software into the markdown format or LaTeX. And tables in markdown can also be labeled, just like figures, so you can reference them without keeping track of what order they appear in.
Math
If you are a quantitative scholar and need to describe your modeling strategy you can do that in markdown. This requires a bit of knowledge of LaTeX: as mentioned above, pandoc converts your markdown to LaTeX before typesetting, you can use LaTeX conventions when we really need to. This is such an instance. So if you want to explain to someone the standard deviation of a population you would write the formula using LaTeX math commands (\sigma, \sum, \frac, \bar, exponents and subscripts, etc.) on its own line and wrap it in double dollar signs ($$) like this:
$$ \sigma = \sqrt{\frac{ \sum (x_i - \bar{x})^2 } {N - 1}} $$
which renders your math beautifully:
$$ \sigma = \sqrt{\frac{ \sum (x_i - \bar{x})^2 } {N - 1}} $$
You can also insert math inline with your text $\mu = \frac{ \sum_{i=1}^{n} x_i} {n}$ using single dollar signs in line with the rest of your text, like:
When $a \ne 0$, there are two solutions to $(ax^2 + bx + c = 0)$ and they are $x = {-b \pm \sqrt{b^2-4ac} \over 2a}$.
An Example Project#
We are going to be using an example project that you should have already installed onto your machine when you installed all of the software but in case you forgot run the following line of code to get it:
git clone https://github.com/TimothyElder/plaintext.git
In the pwg-template directory there should be a sub-directory called article-markdown. Open that up and take a look at the file called article-template.md. It is an article I had ChatGPT generate.1 The article-markdown directory should have several files in it:
Makefile
article-template.md
figures
war-of-roses.bib
war.r
Go ahead and take a look at the file called article-template.md. It should contain a header that looks like this:
---
title: The Implications of the War of the Roses on Anglo-Franco Relations
author:
  - Timothy Elder^[University of Chicago, timothyelder@uchicago.edu]
date: January 2023
thanks: "Thank you to the everyone that supported this work."
abstract: The War of the Roses was a significant event in English history that had far-reaching implications for the relationships between England and France. This paper explores the impact of the conflict on the political, economic, and cultural ties between the two countries. The war resulted in significant changes to the English monarchy, which had repercussions for the English crown's relationships with other European powers, including France. This paper provides an in-depth analysis of these impacts, and sheds light on the lasting effects of this important event in English history.
bibliography: [war-of-roses.bib]
---
This is a YAML (Yet Another Markup Language) header and it includes metadata about the paper we are typesetting. In this case it is about the War of the Roses and it lists me as the author. It also includes an acknowledgements, and specifies where the bibliography is located. In this case the bibliography is stored in the same directory as the document so the relative path is just the file’s name.2 You could have something much more bare bones than this if you were just writing a draft of a paper such as this:
---
title: Origins of the War of the Roses --- Draft
author: Tim Elder
---
The paper includes figures, tables, and different styling of the prose. You can use this as a template for other documents so feel free to go ahead and do whatever you want to this file.
Typesetting with Make#
When we are ready to typeset our draft document, we can invoke the pandoc program via Make in the terminal by simply typing in make pdf from the directory with the article-markdown.md file in it. You can inspect the Makefile to see how it works and you’ll quickly notice there are a few extra bells and whistles to the pandoc program. See the figure below for a diagram that will help to explain it.
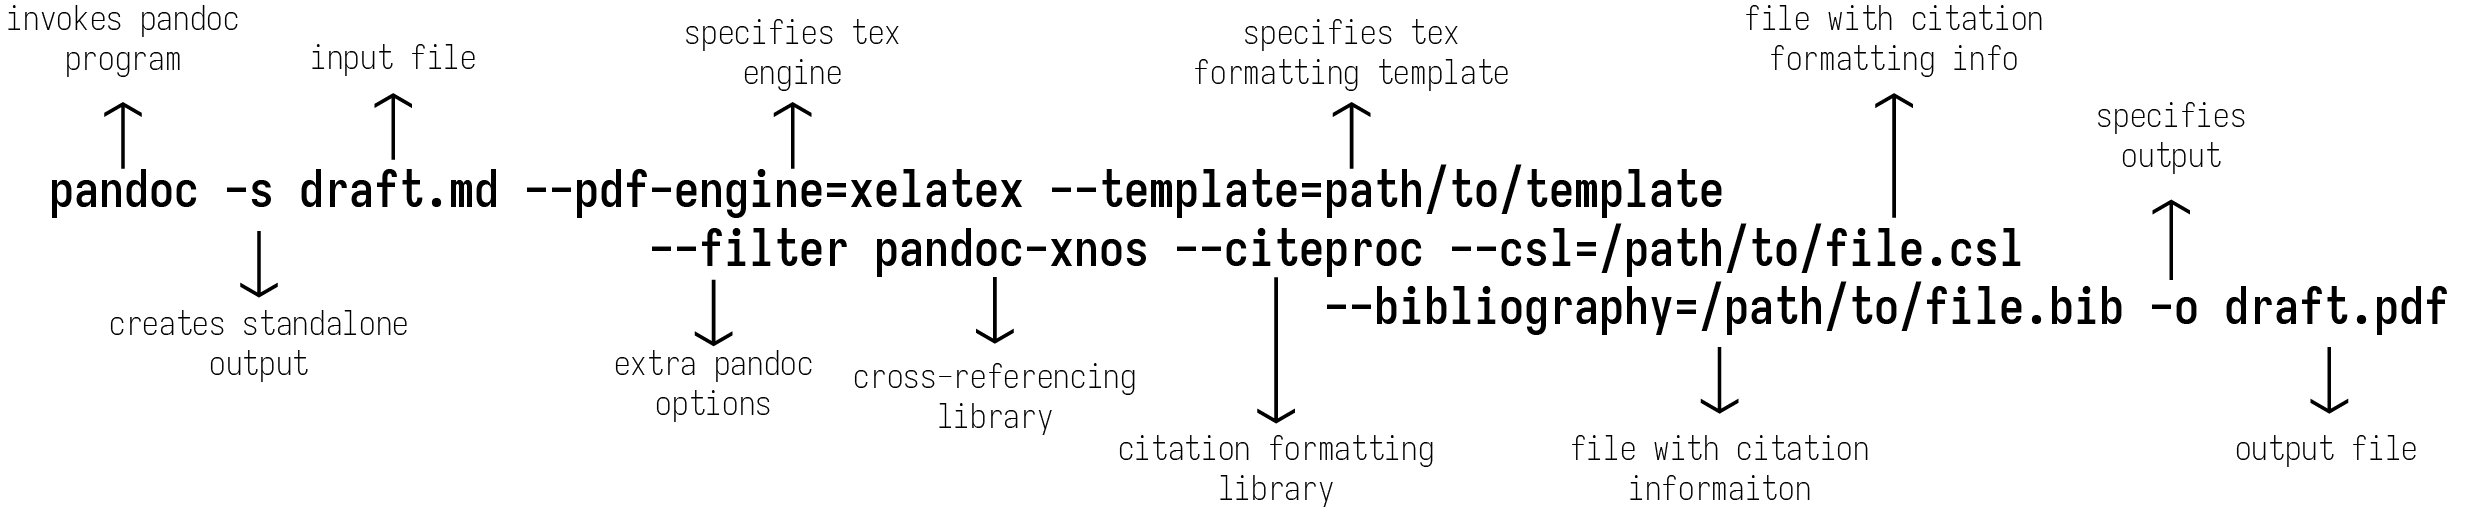
Invoking pandoc with extra bells whistles to typeset a markdown (.md) file into a PDF.
-
I cannot help but mention that the advent of Artificial Intelligent chatbots is only the tip of the iceberg when it comes to safety issues with creating machines capable of doing human tasks. It is fairly harmless to have ChatGPT generate a fake article for me, but it portends near term harm that we should attempt to avoid. I encourage you to checkout the following resources your self [????] ↩︎
-
You can store your bibliography anywhere on your computer and reference it in your document’s metadata. For instance, for most of my work I keep a single
.bibfile (stored at/Users/timothyelder/Documents/socbib-pandoc.bib) which has the citation information for everything I am likely to cite and I always reference that.bibfile in my documents. ↩︎